


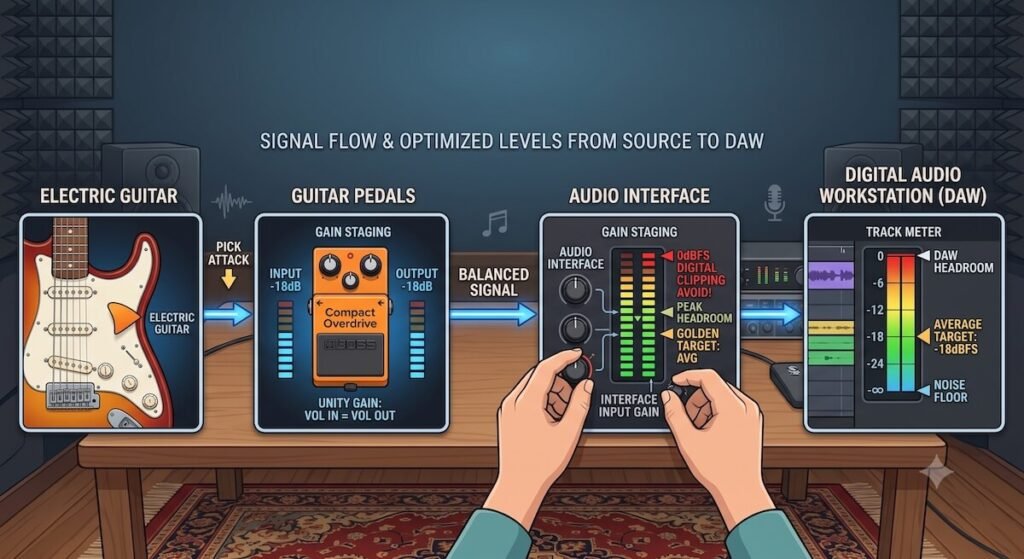
Quick Answer: Gain staging is the process of managing audio levels at every stage of a signal chain—from your instrument and effects pedals through your amplifier, audio interface, plugins, and digital audio workstation (DAW). Proper gain staging helps prevent unwanted clipping, keeps noise under control, and provides enough headroom for mixing and mastering.
Have you ever recorded a guitar track or synth loop in your home studio only to discover that it sounds harsh, noisy, or distorted—even though your master volume wasn’t turned up particularly loud?
The problem may be gain staging.
Gain staging is one of the most important concepts in audio recording and music production. It doesn’t matter whether you’re recording electric guitar through a pedalboard, connecting a microphone to an audio interface, or building electronic music entirely inside a DAW. Managing the level at every stage of your signal chain helps keep your recordings clean, controlled, and easier to mix.
The good news is that gain staging isn’t complicated once you understand what you’re looking for.
Why Does Gain Staging Matter?
Every piece of equipment or software in your signal chain has a level at which it works best.
If the signal is too quiet, you may introduce unnecessary noise when you boost it later. If the signal is too loud, you can overload an input or plugin and create unwanted distortion.
The two main problems are:
1. Too Little Gain
If your recording level is extremely low, you may need to add a large amount of gain later.
That can make background noise, electrical hum, and other unwanted sounds more noticeable.
2. Too Much Gain
If the signal is too loud, it can overload the next stage of your signal chain.
With digital recording, this can result in clipping—a form of distortion that occurs when the signal exceeds the maximum level that the digital system can represent.
Proper gain staging finds the comfortable middle ground:
Strong enough signal + plenty of headroom + minimal unwanted noise
What Is dBFS?
When you’re recording inside a DAW such as Logic Pro, Ableton Live, FL Studio, or Pro Tools, you’ll commonly see meters measured in dBFS.
dBFS means decibels relative to full scale.
Unlike many analog meters, digital meters have a hard ceiling:
0 dBFS = maximum digital level
Going above 0 dBFS isn’t simply “a little louder.” It results in digital clipping.
That’s why you generally don’t want your recording levels sitting close to 0 dBFS.
How Much Headroom Should You Leave?
A useful starting point for modern digital recording is to leave plenty of space between your average signal level and 0 dBFS.
For many recording situations:
- Average level: around -18 dBFS
- Typical peaks: around -12 to -6 dBFS
- Maximum: stay below 0 dBFS
These aren’t rigid rules. Different recording situations, interfaces, plugins, and workflows can use different targets.
The important idea is simple:
You don’t need to record as close to 0 dBFS as possible.
Modern 24-bit digital recording provides plenty of usable dynamic range, so leaving headroom is usually the safer and more flexible approach.
Step-by-Step Gain Staging for a Home Studio
The easiest way to understand gain staging is to follow your signal from the source to the final recording.
A typical guitar setup might look like:
Guitar → Pedals → Amplifier / Amp Sim → Audio Interface → DAW → Plugins → Master
Let’s look at each stage.
1. Start with Your Instrument
Your guitar, keyboard, microphone, or other instrument is the beginning of your signal chain.
With electric guitar, the pickups generate the initial audio signal.
Your playing dynamics matter here. If you play aggressively, your peaks will naturally be higher.
Don’t try to make your guitar as loud as possible at this stage.
Instead, focus on getting a healthy signal into the next piece of equipment.
2. Set Your Pedal Levels Carefully
Guitar pedals are an important part of gain staging because they can significantly change the volume of your signal.
This is particularly important with:
- Boost pedals
- Overdrive pedals
- Distortion pedals
- Compressors
- EQ pedals
For example, imagine you have an overdrive pedal with the gain set fairly low but the level control turned up significantly.
The pedal might sound louder and more exciting, but it could also push the next stage of your signal chain much harder.
This isn’t necessarily bad.
In fact, pushing an amplifier or another pedal is sometimes exactly what you want.
The important thing is to understand what you’re driving.
Tip: Match Levels When Possible
When switching an effect on and off, try comparing the volume of the processed and unprocessed signal.
If the effect is dramatically louder, it can be difficult to tell whether you actually prefer the tone or simply prefer the louder signal.
3. Set Your Amplifier or Amp Sim
If you’re using a physical guitar amplifier, your amp is another major gain stage.
If you’re recording through an amp simulator, the same principle applies inside the software.
Pay attention to:
- Input gain
- Preamp gain
- Channel volume
- Master volume
- Amp input level
Different amp models can respond very differently to input level.
For example, pushing the input harder may create more saturation, while reducing the input level may give you a cleaner response.
That’s part of the creative side of gain staging.
4. Set Your Audio Interface Input Gain
This is one of the most important steps when recording.
Your audio interface converts the incoming analog signal into digital audio.
If the input gain is too high, your interface can clip before the signal even reaches your DAW.
Start with the interface gain turned down and gradually increase it while playing at your normal performance volume.
Watch the input meter.
You want a healthy signal without constantly approaching the top of the meter.
For Guitar
Play the loudest parts of the song while setting your interface gain.
Don’t set the level based only on quiet picking.
You need enough headroom for the strongest notes, chords, and strumming.
5. Check the Level Inside Your DAW
Once the signal reaches your DAW, check the recording channel’s meter.
Your recorded peaks should remain comfortably below 0 dBFS.
If your peaks are around -12 to -6 dBFS, you generally have plenty of room to work with.
If the meter is repeatedly hitting 0 dBFS, lower the input gain.
Important:
Don’t solve clipping by simply turning down the DAW channel fader.
If your audio interface is already clipping before the signal reaches the DAW, lowering the DAW fader won’t remove that distortion.
Instead, reduce the input gain at the interface.
Gain Staging Inside Plugins
Gain staging doesn’t stop once you’ve recorded your track.
Plugins can also change the level of your signal.
This becomes particularly important when using:
- Compressors
- Saturation
- Distortion
- EQ
- Tape emulation
- Amp simulators
- Limiting plugins
For example, an EQ boost can increase the overall level of your signal.
A compressor can reduce peaks and then add makeup gain.
A saturation plugin can add harmonics and increase perceived loudness.
Each plugin becomes another potential gain stage.
What Is Plugin Gain Staging?
Imagine you have this chain:
Guitar → EQ → Compressor → Saturation → Delay → Reverb
If your EQ adds 6 dB of gain, the compressor receives a much hotter signal than it did before.
The compressor may therefore behave differently.
Then, if the compressor adds makeup gain, the saturation plugin receives an even louder signal.
By the time the signal reaches the final effects, it could be significantly louder than the original.
That’s why it’s useful to check your meters throughout the chain.
What Is Gain Matching?
Gain matching means comparing processed and unprocessed signals at approximately the same perceived volume.
This is especially useful when using plugins.
For example, you add saturation to your guitar and suddenly think:
“Wow, this sounds much better!”
But if the saturated version is 4 dB louder, your ears may simply be interpreting the increased volume as an improvement.
Turn the output of the plugin down until the processed signal is roughly the same loudness as the bypassed signal.
Then compare again.
This makes it much easier to judge whether the plugin is actually improving your tone.
Gain Staging for Guitar Pedalboards
Gain staging is especially useful for guitarists because pedals can dramatically change signal level and dynamics.
Consider this setup:
Guitar → Compressor → Overdrive → Chorus → Delay → Reverb → Interface
Each effect has the potential to change your signal.
Compressor
A compressor can make your guitar more consistent while increasing overall sustain.
Overdrive
An overdrive pedal can add both gain and volume.
Chorus
Chorus usually doesn’t dramatically increase gain, but its mix and level controls can change the perceived volume.
Delay
Delay can add energy to the signal through repeated notes.
Reverb
Reverb creates a large amount of additional sound energy, particularly with long decay settings.
For ambient guitar, this is especially important because long delay and reverb tails can build up quickly.
Gain Staging for Lo-Fi and Ambient Guitar
If you’re creating lo-fi or ambient music, gain staging becomes even more useful.
Ambient guitar often involves:
- Long delays
- Large reverbs
- Modulation
- Saturation
- Layered recordings
- Volume swells
These effects can create a lot of energy in the background.
If every layer is recorded too loudly, your mix can quickly become crowded and muddy.
Instead, leave plenty of headroom and let the effects create atmosphere without pushing every channel toward 0 dBFS.
A quieter individual track can actually sound much better once several layers are combined.
Common Gain Staging Mistakes
Recording Everything as Loud as Possible
This is one of the most common mistakes.
You don’t need your guitar track to peak at -1 dBFS.
Leaving headroom makes mixing easier and reduces the risk of accidental clipping.
Using the Master Fader to Fix Clipping
If your individual channel is clipping, turning down the master fader isn’t the correct solution.
Find the stage where the signal becomes too loud and reduce the gain there.
Ignoring Pedal Output Levels
A boost or overdrive pedal can send a much hotter signal into your amplifier or interface.
If your clean tone is fine but your pedal tone suddenly clips your interface, check the pedal’s output level.
Putting Every Plugin at Maximum Volume
Plugins don’t need to make your track louder just because they’re being used.
After processing, check the output level and compare it with the bypassed signal.
Thinking -18 dBFS Is a Universal Rule
You’ll often hear that everything should be exactly -18 dBFS.
That’s not necessary.
-18 dBFS is a useful reference point, particularly because many analog-modeled plugins are calibrated around this general operating level.
But your recordings don’t need to sit exactly at -18 dBFS.
The more important goal is to maintain a healthy signal with sufficient headroom and avoid clipping.
A Simple Gain Staging Checklist
Before you start recording, run through this checklist:
1. Set your instrument level
Make sure your guitar, keyboard, or microphone is producing a healthy signal.
2. Check your pedals
Make sure boosts and gain pedals aren’t unnecessarily overloading the next stage.
3. Set your amplifier or amp sim
Choose the amount of gain and volume you actually want for the tone.
4. Set your interface gain
Play the loudest section and make sure the input doesn’t clip.
5. Check your DAW meter
Leave plenty of headroom below 0 dBFS.
6. Check your plugins
Watch for unexpected increases in level.
7. Gain-match processed sounds
Compare plugins at similar loudness when deciding whether they improve your sound.
Does Good Gain Staging Make Your Music Sound Better?
Gain staging isn’t a magic tone enhancer.
A perfectly gain-staged recording won’t automatically make a bad guitar tone sound great.
What good gain staging does is create a clean, predictable foundation for your recording.
It helps you:
- Avoid unwanted clipping
- Reduce unnecessary noise
- Keep plugins behaving predictably
- Maintain headroom
- Make mixing easier
- Preserve dynamics
- Build cleaner mixes
Once gain staging becomes part of your normal workflow, you won’t have to think about it as much.
Final Thoughts
Gain staging is simply about controlling the level of your audio throughout the entire signal chain.
You don’t need to make every track as loud as possible. Instead, aim for a healthy signal, leave enough headroom, and pay attention to how each piece of equipment or software affects the level.
For guitarists, this means thinking beyond the DAW meter. Your pickups, pedals, amplifier, audio interface, amp simulator, plugins, and master bus all form part of the same signal chain.
Once you understand how those stages interact, recording becomes much easier—and you’ll have more room to focus on the part that matters most: making music.

